Continued from the previous post
There’s a major problem with the circuits shown earlier. They all have a capacitor between their output pins (marked C3 in the following picture).
 The capacitor shown in the red circle
This capacitor is needed by the voltage regulator (LDO) and provides other features like filtering and stability, so it cannot be omitted.
Let’s see the following situation:
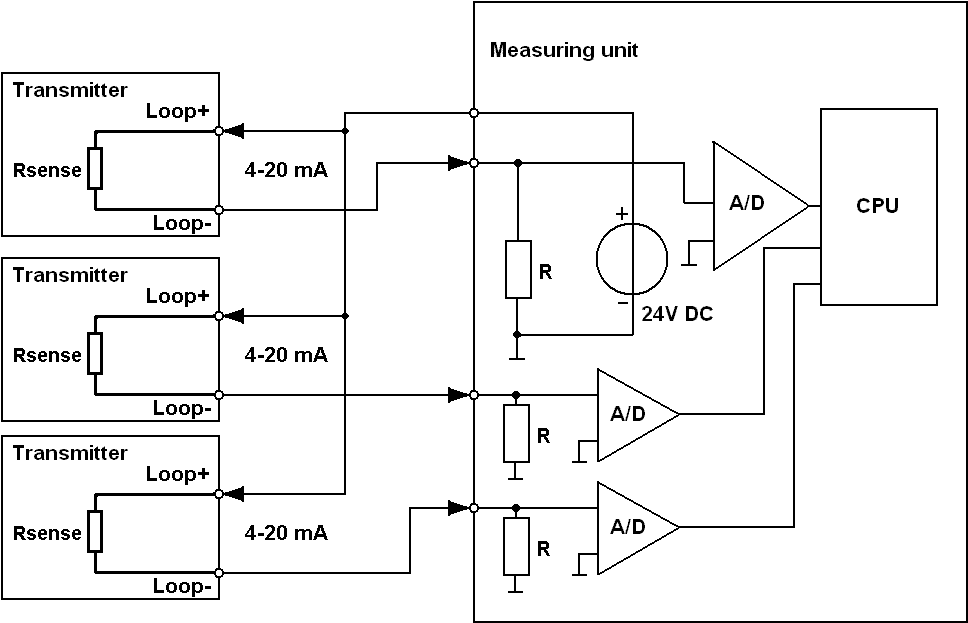
 2 wire transmitter elements in the measuring loop at startup
We have a 24V power supply with a maximum of 2A output current, a 2 wire transmitter and a 4-20 mA analogue PLC input (with measureing resistance of 50 ohms).
The power supply is switched off, so the transmitter is de-energised (not working because the lack of power). At the time we switch on the power supply, the transmitter’s internal (output, C3) capacitor is beginning to charge and actually it is functioning like a short circuit. For a little time, the power supply’s output 24V falls across the transmitter’s output resistor (10 ohms) and the PLC’s input 50 ohms, which means 400 mA current.
Normally the PLC’s input measures a maximum of 1V (20 mA flowing through 50 ohms), but in this case it is 20V, which is not permissible even for a short period of time.
If we use a common power supply with multiple transmitters, the power supply’s output current limit is easily reached, thus we overload the PLC input, the transmitters and the power supply itself. It is not the nice situation that we should cause.
 Switch on behaviour in multiple transmitter environment
We have to find some solution to avoid the switch on inrush current.
The first is to protect the PLC input from the excessive current with protection diode (two diodes in this case). This solution limits the voltage across the PLC input’s measuring resistor, but this way we put even more inrush current to the transmitter (actually the swtich on current would be 2,26 amperes if the power supply could provide this).
 Protecting the PLC input
A very simple way to limit the current is to put an inductor in series with the current loop. At switch on this inductor acts as an open circuit and lets the current flow slowly increasing as the inductor’s magnetic field builds up.
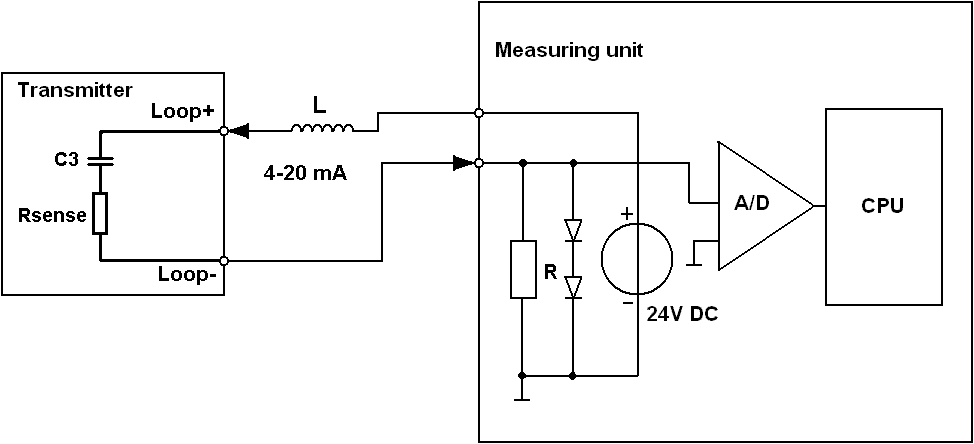 Inrush current protection with an inductor
This is simple and reliable, but this also slows down the whole measuring circuit. If the transmitter would like to rapidly change its output current from 4 to 20 mA, the series inductance simply not allows this.
On the other hand, the inductance in series with a capacitor forms a 2nd order LC circuit which can case excessive ringing if not properly tuned, which is to be avoided too.
We can use a JFET instead of the inductance. If we connect its gate to its source the maximum current that flows through it, is its Idss. We should only choose a proper type with a maximum of approximately 30 mA and the whole switch on problem is solved. Simple and wonderful solution!
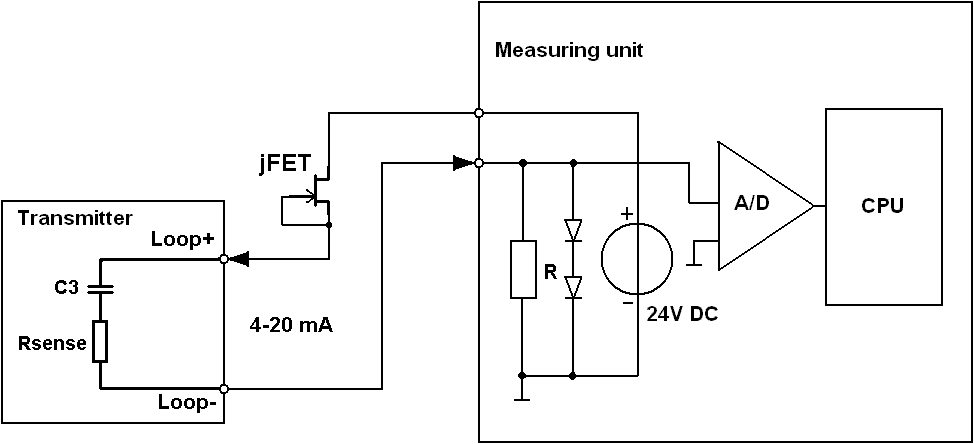 Inrush current protection with jFET
But think over a little bit: if we use a current limiting device (the JFET) which even can be controlled, why not omit the transmitter’s NPN transistor? If we control the JFET’s gate voltage near to its source potential, it lets more current flowing through, if we lower the gate voltage it reduces the current flow. Two problems solved with only component!
At start, the JFET limits the inrush current, and at normal operation it controls the measuring loop’s current.
 2 wire transmitter’s internal electronics with a controlled jFET
The applicable JFETs are for eg.: J111, PN4392, J310
As it is always, there are pros and cons. The disadvantage of this solution is that it is hard to find a proper JFET for this type of application (but not impossible!), and care must be taken not to overheat the JFET.
If the transmitter’s electronics is working with 5V, the current loop’s current is 20 mA, the voltage across the PLC’s input is 1V (50 ohms x 20 mA) and the power supply generates 24V, then the voltage across the JFET is 18V, while consuming 20mA. Its power dissipation is 0,36W, which could be too high for a simple TO-92 or SOT-23 case.
The use of a proper heat sink is a must!
So to put it all together:
Care must be taken to aviod switch on currents. If the transmiter measures slowly varying signals (like environmental temperature monitoring) a single inductor works well. All the other cases need JFET solution.
Don’t forget to protect the transmitter from reverse polarity connection. Always use a diode bridge at its input terminals.
It is often a desire to have a galvanic isolation inside the transmitter, since the current loop cannot be grounded, but on the measuring side grounding is needed.
Keeping in mind these things will protect anybody from unwanted faults.
So when we think of a „simple” 2 wire, 4-20 mA transmitter, it is not simple at all!
How to measure and transmit accurately, what to do in order to maintain the transmitters accuracy for a long time is an other story… but these issues are common for all measurements not only for 4-20 mA current loops.

Hi.
i’m trying to build the circuit in picture “2 wire transmitter’s internal electronics with a controlled jFET”, but I’m not getting any variation of current at the output. I’m using the following resitor values:
R1 = 150k+100k+ Pot 10k
R2 = 1M + 22k + Pot10k
R3 = 100k
Rsense = 100R
And I’m not realy sure about the cap C1…
I’m wodering if I’m using big values on the resistores, since you point in the first part of this post R3 = 10k and Rsense = 10R.
Best Regards,
Daniel Tavares.
LikeLike
Hello
At first, the values you are using could be OK, BUT if you also included D1 in your desing, probably that diode stops everything, an other possible reason is the op amp that must be low power CMOS (rail-to-rail input-output) type.
I made a quick calculation with your values (not including the pot values), which gave me approx. 4.8 mA – 20 mA output current with 0-3.78V input voltage. (not taken the D1 diode into account).
The value of the cap C1 is not critical, could be 1nF for eg.
Hope this helps…
LikeLike
Thanks for your reply. At this moment I managed to get this working without D1 and using a voltage regulator. But when I change the voltage regulator to a TL431 I get the following:
5V rail – ok
Voltage across the load resistance around 18V (since I’m feeding 24V).
Changing the input voltage doesn’t have effect.
By the way I’m using the MCP617 (opamp) and the J111 (JFET).
Best regards,
Daniel Tavares
LikeLike
I’m not completely clear about what you mean on voltage regulator, but do not confuse TL431 with a voltage regulator…
On the other hand, J111’s datasheet says: Vgs(off) can be as high as -10V, so if you (unfortunately) have a high Vgs(off) rated J111, then the circuit will not work…try J112 or even J113 if you can…
MCP617 should be Ok.
All the best!
LikeLike
Hi.
I need some help. I’ve tried several of your circuit and I cant manage one to work. I’ve tried with a voltage regulator, zener, tl431. I don’t know if the problem is at this point. Also I’ve redone the math and I found a error on my calculation. I made a needed correction but still don’t get it to work.
Can you help me?
Best regards,
Daniel Tavares
LikeLike
Please tell me which circuit is not working…
LikeLike